If you live in the USA, you know fresh turmeric rhizomes are harder to find than the powdered version. On that note, we are going to explain to you how to grow turmeric on our own at home using some successful tips and techniques.
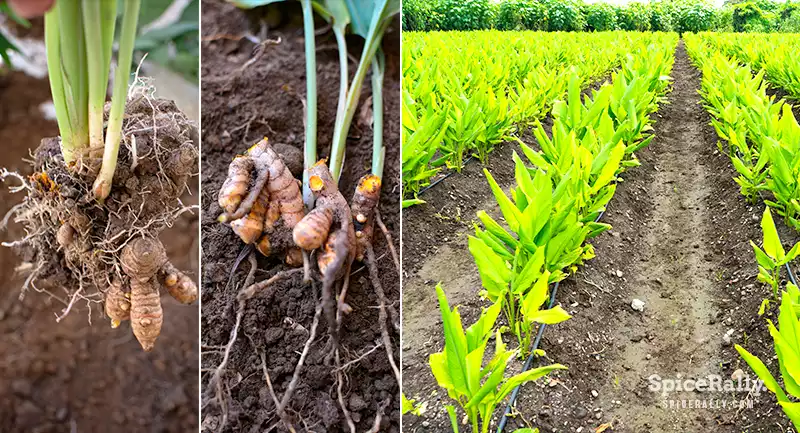
Turmeric grows from rhizomes, and these plants require well-drained, neutral soil and a sunny location. Moreover, to plant them indoors, you will need to have pots that are at least 12 inches deep. They will take from 6–10 months to sprout and are usually planted in winter and harvested by the next fall to early winter.
So, read along to many more details about having your own turmeric plants at home, which is absolutely possible!
How To Grow Turmeric
If you have that “spirit” for gardening and need the happiness of growing your own crops at home, the good news is that cultivating turmeric is not as hard as you think! In fact, since this is a tropical plant familiarized with Asian soil, you might have doubts if there could be a possibility of succeeding in your backyard.
It truly can! If you use the right soil type and follow our instructions properly, you can get a good, healthy yield within a few months’ time. On the bright side, turmeric is a plant that can be cultivated in a large surface area or even in a pot inside your living room.
Turmeric can be grown outdoors year-round in USDA zones 8 and higher, in the ground, or in pots. You can also use wine barrels, allowing you to regulate the moisture level and soil quality easily.
In zones seven and lower, cultivating turmeric is still possible. If you live in these zones, you can plant them in a transferable pot indoors and bring them outdoors when the weather warms. However, you need to be careful and see if the plant sprouts while it is still inside, and it will need generous sun or light.
Plant Description
Turmeric comes from the monsoon forests of South East Asia. It is a perennial plant that is about 1m tall with underground rhizomes. It grows tall and captivating white flowers that point if clusters are kept steady for a year.
This plant usually needs sufficiently-drained soil, a frost-free climate, and 1000 to 2000mm of rain yearly or additional irrigation. It grows best on earthy or terrestrial fertile soils and despises waterlogging.
The heavy shade will downsize the harvest, while light shade could be favorable enough for a good yield. The young greens of turmeric are also edible and are incorporated into various salads. Mature leaves are often used for wrapping up meat and fish for grilling.
How Can I Grow Turmeric At Home?
Growing turmeric at home is easy and not at all rocket science! You can have a great yield if you consistently monitor your plants and provide them with the required water and light.
In most regions of the U.S., turmeric will grow best if you plant it inside in the late winter. You can either keep it indoors as a houseplant all summer, depending on how much space you have indoors and outdoors.
Or else, you can move it outside when it is entirely frost-free, and the weather is sufficiently warm to put out your eggplant seedlings and pepper. And, as mentioned previously, if you live in zones 8-11, you can grow it outside.
How To Grow Turmeric Indoors
01- Preparation
First, you’ll have to buy fresh rhizomes. For this, you can look for them in your local supermarket or health food stores. But, sometimes, you will find it challenging to find fresh turmeric rhizomes in these places.
If so, they will definitely be available in Asian or Indian grocery stores. In addition, online shopping sites could be your next best option. There are plenty of sellers whom you can count on! Make sure to choose plump rhizomes with lots of buds along the sides as possible.
Then, prepare pots or planters that are at least 12 inches deep and 12–18 inches wide. Once you plant your rhizomes, they will need a lot of area inside the pot to grow.
Turmeric has the possibility to grow up to 3.5 feet tall. Therefore, choose a pot that will be big enough to keep it up as it grows. Plastic or ceramic planters or pots are ideal for this job. As the next important tip, make sure the planter or pot you chose has good drainage at the bottom.
02- Cutting The Rhizomes And Planting
Cut your rhizomes into 2–6 inch pieces so that each piece has 2-3 buds. Then, choose good-quality indoor organic soil and fill the pots about 3-6 inches with the soil. Now, lay a section of rhizome flat on top of the soil with the buds facing upwards.
Keep a rhizome in the middle of the soil and turn the rhizome so that the bulk of the buds are facing up towards the opening of the pot. The stalks of your turmeric plant will grow out of the buds.
Thus, as long as most of them are facing the opening of the pot, they pretty much grow in the direction of the opening. You don’t have to worry about a stalk extending out of the bottom of your pot. In fact, it will just wither away when it can’t obtain any sunlight after it grows. Cover with more soil, leaving 1-2 inches at the top.
03- Watering
Fill a water sprout or a large cup with regular tap water and pour it generously across the surface of your pot until the soil gets noticeably wet. Be gentle and do this slowly since harsh watering could drown your rhizomes.
04- Covering Your Pot Or Planter
For this, you can get planter bags or large trash bags. Slip your pot inside the bag, folding it over at the top, so the opening is slightly capped. Sealing the bag is not necessary since a bit of airflow is required to promote its growth.
Your plant will grow even without this plastic bag. But leaving the plant humid will be an important factor for sprouting. If you can’t keep your turmeric plant in a plastic bag, you can opt for misting it daily with a water-filled spray bottle.
05- Keeping Your Plant Warm
Then, place your pot in the warmest place you can find inside your house. If in case you can’t find such a warm place in your home, you can make an easy germination room using a small desk lamp or a heating pad, thermometer, and a picnic cooler. Having light is not a concern at this stage.
06- Taking Care Of The Plants
You can water your plant every 2-3 days to keep the soil moist. Remember that your rhizomes will need to be watered regularly if you live in a warmer climate since there’s a probability for water to evaporate quickly.
Check on your pots, and when the sprouts start to pop up, you can move your pots or planters under a grow light or to the windowsill. Then, as the plant begins to grow out of its plastic cover, you can remove it.
07- Transferring To A Larger Pot
Once your stalks have popped up, you will have to transfer them to a larger pot where they can be exposed to sunlight. When doing this, pour soil midway into your new pot and dig your hands into the soil of your turmeric pot around the root to locate the rhizome.
Now, lift it carefully out of the soil, moving topsoil out of the way by hand as required. You can use the same soil that you used to plant your rhizome initially.
How To Grow Turmeric Outdoors?
If you live in a climate that has fairly warm conditions over a long season, you can plant your turmeric in an in-ground or raised bed. The rhizomes will be too slow to sprout if the soil is too cool. However, you should make sure that you have plenty of room allowing the plants to grow so that they will not unnecessarily shade other plants.
Suppose you live in a milder climate, then you will have to adjust to changes in the growing environment. In such cases, you can plant turmeric in a mobile pot that can be moved indoors when required.
Nevertheless, planting in pots lets the turmeric plants be moved around to give them lots of sunshine and heat but allows for shade or supplying filtered sun if temperatures are harsh.
Choose your rhizomes, source them as mentioned previously, and you can bury your rhizome like 2 inches beneath the soil. Remember that the soil has to be well-drained and fertilized.
Cover your rhizomes with soil just like we explained when you plant them in pots. Plant each rhizome about 10 inches apart. Water them regularly, and you will see the leaves emerging within 1-2 months after the rhizomes are planted.
Protecting Your Indoor And Outdoor Plants From Physical Damage
As we mentioned on top, monitoring your plants consistently is really important. So, if you ever noticed a caterpillar feeding on your plants or a thrips infestation, don’t worry since there are possible treatments for such physical damage.
If you notice any unwanted bus, you can use an organic pesticide like a nontoxic oil treatment or neem oil. And if you happen to come across any grayish or pale scale damages in your rhizomes, you will have to throw them away to prevent the infestation from spreading. In such infestations, you can also treat your soil with dimethoate.
Harvesting Indoor and Outdoor Plants
If you keep a close eye on your plants, water them as required, and watch out for sun and shade, you will get the results of your hard work from 6-10 months! Remember that the ideal time to harvest your turmeric is when the stems and leaves of your plants turn dry and brown.
But, if you let the plant grow even after that, it will gradually rot over time and destroy any conceivable turmeric that you could yield. You will have to get to the adult rhizomes beneath the soil to harvest the turmeric.
To begin, use a cutting knife or garden shears to pull the stalks near the soil. Then, dump the leaves by composting them. And if the plant is dry enough, you should be able to take off the stalk near the base simply.
Rinse the extracted rhizomes well with clean water until the soil is thoroughly washed off. You can keep these homegrown turmeric rhizomes in your refrigerator for up to six months in a plastic bag or a storage container.
Make Your Gardening Experience More Valuable By Growing Turmeric!
A turmeric plant is worth having a space in your garden or a place inside your home. In fact, growing this precious spice is not at all a tough job when you follow the proper planting techniques and have suitable soil, growing environment, and patience!
You can enjoy a great, healthy harvest if you have well-drained soil, spacious pots or planters (if you are planting them indoors), the right amount of sunlight and shade, water them as required, and watch them closely for any physical damage.


