Cumin is a ubiquitous culinary spice that is used in a wide variety of dishes and is valued for its medicinal uses. In this article, we will address how to grow cumin successfully in your own home garden.
Cumin is not really hard to grow. It is a low-grown annual herb that typically requires a warm climate and grows best in full sun when sowed in well-drained, sandy loam or loam soil. You can grow cumin in your home garden if you live in the USDA zones 5-10. Cumin seeds are directly sowed into the soil and usually yield after about 120 days from the date of growth.
Read further to learn some essential tips and tricks to having lucrative, healthy cumin cultivation at home.
How To Grow Cumin At Home?
If you are someone who uses cumin just with everything, having even a few cumin plants at home would be really beneficial. While dried cumin seeds are incorporated into cooking and baking in various ways, young cumin leaves are also used in certain preparations.

If you are ready to invest a little more time and effort, growing cumin in your home garden is not at all difficult! This herb does not tolerate frost, so you must provide a warm atmosphere with plenty of sunlight to cultivate successfully.
But on the bright side, you can prepare the seeds indoors while it is snowing and then move the plants outside once the frosting is over. You can use pots and provide the required temperature while your cumin plants are inside.
Important Tip: When preparing to grow cumin, it is essential to know that each plant makes a small number of seeds. If you expect to cultivate large amounts of cumin, you must estimate how much room you need to produce a profitable crop.
Cumin is ideal for companion cultivation in an assorted vegetable garden. The flowers attract advantageous insects, such as predatory wasps, that graze on pests like caterpillars that strike cabbage family crops. Thus, it would be best to plant cumin side-by-side with these crops for the utmost advantage.
Plant Description
Cumin is an annual herbaceous plant of the Apiaceae family distinguished by presenting its flowers placed in umbels. The umbel is a type of inflorescence identical to an inverted umbrella which is composed because all the flower stalks are hooked to the stem by the same point. This plant has a vertical stem, slightly branched, and is not very tall, from 20-50cm (sometimes 80cm).
The inner core of the stalk is white. Cumin leaves are positioned alternately to the stem petiole, connected, hairless, long, and separated. This plant is effortlessly recognized because its foliage is split into filiform components. They are very analogous to those of dill, which belongs to the same family as cumin.
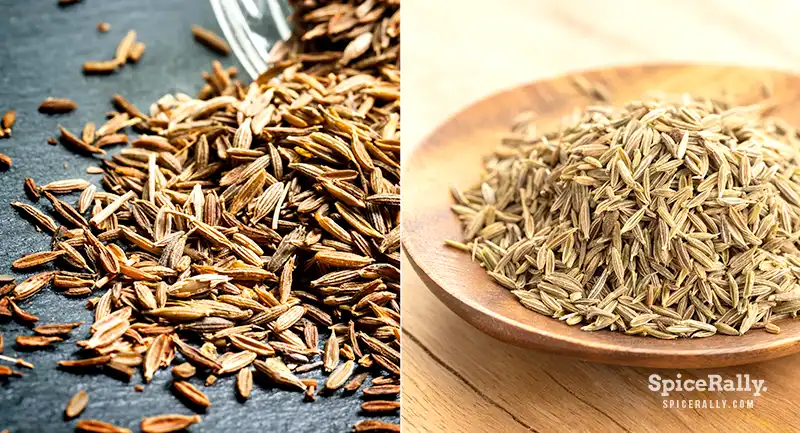
The inflorescence is a terminal that has little hermaphrodite flowers, pink or white. Each umbel may include between 3 and 5 radios. The fruit of the cumin plant is categorized among the nuts, and it’s a daichene. They are ash-brown, elliptical, slim, and pubescent from 5-6mm long and 1-2mm thick.
Starting To Plant Cumin Seeds Indoors
Preparing The Seeds
Growing cumin from seeds is the most effortless and affordable way. You need a few weeks ahead to get them initiated. Grow your cumin seeds inside, so they have enough time to develop by the time spring reaches. You can buy cumin seeds at most garden supply stores, nurseries, or online.
Position your seeds in a medium-sized container, and pour 470–1180 ml of water to cover the seeds. After 8 hours, empty the water and set the seeds on a clean paper towel until you are prepared to plant them.
Tip: The seeds start sprouting when wet, enabling them to germinate quickly once you plant them.
Planting
Fetch a large pot so that you can fit a few cumin plants in one container. Choose a container with at least two hollows so the soil can drain adequately. These plants can be grown indoors efficiently, even though raising them outdoors is the best method.
Get yourself some loam soil into your pot. You can use a garden spade to get this done, and you can use a plastic cup if you don’t have a garden spade. Keep loading it up until you almost get to the top. It would be best if you could use fertile, well-drained, sandy loam soil for optimal results. Loam soil is made of silt, sand, and a little amount of clay.
Cumin plants do not have enormous roots. Pull a bit of soil with a spade or your fingers to position the seed smoothly. Allocate each seed in a place at a minimum of 4 inches away from the other. These seeds can sustain each other as they mature, which is beneficial when initiating from seeds. After you dig your pits, take your seeds from the paper towel and put them into their pit.
Shovel up a scrap of your loam soil, and scatter it over the top. Put about 1⁄2 inch of soil on top. These plants need direct sunlight for most times of the day. Therefore, locate a south-facing window, and set your plant in a plant stand or on the windowsill next to it. This is an effective way to provide enough sunlight even though you have your plants inside.
Tip: You can invest in T5 high-output fluorescent plant lights from a garden center or a home supply store. Set them 1 foot beyond your plants. Observe the guidelines on the packaging about how to assemble your detailed grow set-up. Keep the lights on for 12 hours a day.
Placing A Fan
Let an oscillating fan run for at least 2 hours daily to support air flow and ventilation. Position the fan 5–8 ft away from your plants and bend it so the airflow fronts your plants’ direction. This will facilitate the plant, causing it to develop firm and sturdy.
Moving The Seedlings Outdoors
As mentioned previously, cumin grows best in hardiness zones 5-10. These plants love dry, warm weather, but if you don’t live in these regions, you can continue keeping your plants indoors.
If you are transplanting your seedlings outdoors, the best time would be to start in the spring. Pick a location in your garden or backyard where your cumin can obtain direct sunlight for many hours of the day.
Planting
Cumin plants develop healthily almost anywhere in your garden. So, you can transplant your seedlings outside 1-2 weeks after the last frost, preferably when the temperature is invariably warm. Moderate temperatures should be 60 °F; consider planting them in raised beds or boxes. These plants will abide by soils with pH 6.8 to 8.3, but the perfect scope is 7.0 to 7.5.
Cumin plants and seedlings do not have massive root systems; hence, you only need to excavate a small hole about 1/4 inch deep using garden spades. For optimal results, position each plant or seed at least 4 inches apart from the next. In addition, you can arrange each row about 18 inches away from the other, so your plants have enough space to develop comprehensively.
Sowing your cumin plants packed together is beneficial because the plants back each other during the time of harvest. Position the plant in the center of your pit, and shovel the soil using your garden spade.
Keep digging soil until the cavity is packed to the top. Cumin plants are relatively well-built and can adapt to several soil types. You can buy the soil at garden stores or home supply stores.
Taking Care Of Your Cumin Plants
Watering
Use a watering can or hose to water your cumin plants routinely, at least 1-3 times a week, about 30-60 seconds, to keep the soil moist. Be mindful not to overwater your plants. Cumin plants do not like extended periods of arid heat.
So it is vital to keep them hydrated. They can get dehydrated and parched in the summer months, so fill up a spray bottle with water and soak your cumin plants. Do this as required or about once a week. You can splash the stalks, tips, and roots.
Stay until the soil is almost dry before you water your plants again and soak the soil comprehensively. If you keep watering wet soil, your cumin plants can develop mildew or begin to rot.
Applying Fertilizer
A suitable balanced organic soil conditioner can be incorporated into the soil early in the year prior to sowing. Provide cumin plants with a balanced organic liquid fertilizer as soon as blooming stems start to grow. Do not use fertilizers hefty in nitrogen, as this will decrease the aroma and flavor of the harvested seed.
Diseases And Infections
Pests
Aphids attack the young plants, grazing on the phloem sap, resulting in deformed stems and leaves. Aphids also bear several other plant diseases. You can use helpful insects such as ladybug larvae as a biological treatment. Or else, spray with neem oil or a fine organic insecticidal soap.
Diseases
Fusarium Wilt
Fusarium wilt is a soil-borne fungal disease that interrupts a plant’s capability to transport water and stay hydrated, resulting in withered leaves, sagging stems, and matured leaves turning yellow. This disease also spreads through infected seeds, insects, and tools.
Therefore, keeping all tools sterile and buying high-quality seeds is crucial. Infected plants should be eliminated and not composted. Gardening experts show that using a biological fungicide like MycoStop on the soil has exhibited signs of diminishing the spread of Fusarium.
Alternaria Blight
This fungal disease thrives in warm, humid states and spreads through infected seeds and soil. The tender leaves of cumin are bruised completely by this disease, which can quickly spread through the whole crop. Extract and destroy the infected plants and remove all plant residue to control fungal spores over-wintering. The organic remedy for this disease is specified as copper fungicides.
Powdery Mildew
This impacts plants located in the moist shade during warm, humid weather. This fungal infection spreads by spores, shrouding leaves with a white growth looking like a dusting of flour, and hinders optimum photosynthesis.
Adequate garden hygiene is crucial to prevent this disease. And extracting infected leafage and resettling plants to flourish in full sun is essential. Use organic fungicidal sprays such as neem oil, sulfur, and potassium bicarbonate.
Harvesting
You can cut 5-6 cumin plants at their stalk after about four months of maturation. Cumin seeds first blossom into small pink and white flowers and then grow into seed pods. When the seed pods turn brown, the cumin is ready to reap. Cut a few plants where the flower joins the stem when you see brown pods. You can use gardening shears or a pair of scissors to get this done.
Important Tip: Cumin seeds usually ripen unevenly, so observe your plants very well after about four months of growth. Continue this every time you see approximately 5-6 plants with brown pods.
Preparing The Cumin Seeds After Harvesting
After you prune down the plants:
- Divide the pod clusters with your fingers and set them inside a brown paper bag. The pods will effortlessly take apart from the plants with little thrust.
- Keep doing this for all your pods, and tie your paper bag using a rubber band or a twist tie.
- Swing the bag upside down from a string on your ceiling in a dry, warm place for about 7-10 days.
After about ten days, your pods are thoroughly dry and prepared for use. Hold one pod between your index finger and thumb to obtain the seeds, and massage your fingers together. The seed will quickly fall out of the pod.
Collect all the seeds, use them immediately, or store them in a tightly-sealed container. If your cumin seeds are not pulling out of the pod, smash your whole brown paper bag against a hard surface to remove them.
Can You Grow Cumin In Pots?
Cumin can be an ideal herb that could control pests in the garden, but it can still be grown in larger pots of 10 to 12 inches in diameter since this is a low-grown herb.
Is Cumin Hard To Grow?
Cumin is not a hard plant to grow when compared to most other crops. When proper care is taken and if you keep a close eye on pests and infections, getting a successful cumin harvest is not at all a challenging task.
How Long Does It Take Cumin To Grow?
Cumin takes about 120 days from the growth date to produce viable seeds. Sometimes this period can be extended up to 150 days.
Concluding Our Ultimate Guide To Grow Cumin At Home
If you did not miss out on a word in our article, it might be clear to you that cumin is not at all a hard crop to grow in your home garden. Since this is a low-grown plant that doesn’t require much space, and you can grow it indoors if you don’t live in hardiness zones 5-6. However, if you take proper care, water, fertilize and look out for pest infestations and diseases, you can get a successful harvest after 120 days of growth.


