If you are involved in baking often and use pure vanilla, there’s no secret about the high price you should spend on it. So, how about growing vanilla at home? This article will discuss this broadly.
Vanilla succeeds the best outdoors in tropical climates, and it is possible to grow vanilla indoors as long as the vanilla bean orchid is exposed to sufficient sunlight. And they prefer high humidity, heat, and enough space to grow in well-drained soil.
So, keep reading as we hope to cover an all-around area explaining each and every detail about growing this edible orchid fruit at home!
How To Grow Vanilla?
Vanilla is often considered like having “black gold” at home since it is the second most expensive spice in the world, while saffron ranks first place. It is packed with a distinct flavor and aroma, also known as the world’s most popular flavoring.
Good things won’t come easy! So, you will have to make a suitable environment for the vanilla orchids to grow and wait patiently for four years for them to mature and produce flowers. Therefore, before beginning, we must say that growing vanilla consumes time, effort, and, most importantly, patience!
Vanilla is botanically a tropical plant. Therefore, if you are living in USDA zones 10-11, you can easily grow vanilla beans outdoors. And if you do not have a garden area or live in other USDA zones, these plants can also be grown indoors or in a greenhouse since they have zero forbearance for frost.
Plant Description
Vanilla is a succulent, herbaceous perennial vine. It can mount trees to a height of up to 15m. The stems are deep green, and the leaves are large, flat, and elliptical-shaped, tapering at both ends.
The flowers are big, pale greenish-yellow, perfumed, waxy, and orchid-like. The fruit is an elongated cylindrical capsule called a pod or bean. Generally, they thrive in a tropical climate under rainforest lower canopies.
The flower survives only one day. In this short window, self-fertile flowers pollinate. If no pollination happens, the flowers drop. As the climbing vine matures in a few years and if the pollination is successful, the fruit starts to form.
They first reach little 6 to 9-inch pods that take about six months to develop. Matured pods are harvested and cured for extraction. Usually, the whole pod is steeped and distilled in alcohol for flavoring. And most often, the vanilla seeds inside the bean are scraped and used to flavor all kinds of baked goods or culinary confections.
Creating The Suitable Environment For Vanilla Growth
As mentioned previously, the environment in which you wish to grow vanilla is essential for the plant to succeed and get a wholesome harvest. Therefore, creating a suitable atmosphere for plants is necessary if you don’t live in a tropical environment.
Since vanilla orchids require plenty of sunlight, space, heat, and humidity to grow, constructing a greenhouse would probably be the best option if you don’t live in a tropical climate. So, pick a spot with morning sun and create the structure yourself or use a greenhouse kit. Cover the construction by adding glass panels or UV-balanced polyethylene or fiberglass.
If you live in a tropical climate, you could grow vanilla outside. Inspect the humidity and temperature of your environment to specify if the conditions are suitable for a vanilla orchid since they succeed in climates with daytime temperatures between 27-29 degrees Celsius (80–85 °F). And at night, temperatures should stay between 18-24 degrees Celsius (65–75 °F).
To reduce the temperature in a greenhouse, you can turn on fans or open vents. And add heat lamps or a heater to raise the temperature. Moreover, it is crucial to maintain the humidity level to help the vanilla orchids to grow appropriately.
So, you can use a hygrometer to measure the humidity in the planting location or greenhouse. Add a humidifier to the area if it is below 85%. And if the humidity exceeds 85%, use a dehumidifier for reduction.
Propagation And Planting
Propagating and planting are the processes that most of us would go wrong and then blame the plants won’t succeed. So, follow the guideline to choose and plant the cuttings properly.
Choosing The Cutting
Choose a cutting that is 15–20 inches long for best results. It would be best to buy several cuttings in case some of them don’t make it. You can purchase these cuttings from your local florist, garden center or order them online.
However, if you are not knowledgeable about the cuttings, make sure to ask the vendor which tip of the cutting is the top and which is the bottom. The top is the angle at which the plant has been developing, and the leaves will point down toward the base of the cutting.
Preparing The Pots
A clay pot of 12 inches or more will provide your orchid size, resilience, and a healthy root system. You can use peat moss and fir bark to ensure the soil has adequate drainage. As an alternative, you could use a potting medium prepared for orchids.
Generally, orchids do better in small pots than in large ones or directly in the soil. You can purchase all of these materials at home improvement stores or garden shops.
Furthermore, vanilla orchids succeed in a potting medium with a neutral pH of 6.6 to 7.5. You can use paper test strips or a commercial test probe to test the soil’s pH level.
Add lime to boost the alkalinity or incorporate organic matter (such as more peat moss) to raise the acidity if you need to alter the pH.
Planting And Watering
Plant the plant’s bottom two leaf joints, or nodes, about 1 inch into the potting medium. Then, gently tamp the potting medium with your hands to balance the cutting. Do not oversaturate your vanilla orchid, which could rot the root.
Water the orchid sparingly, instead of profoundly, just until the potting medium is damp. It would be best to use distilled water as much as possible since the minerals in tap water aren’t suitable for plants.
Taking Care Of Your Vanilla Plant
Vanilla orchids will get burned and withered if you place them in direct sunlight. So, select an area of the greenhouse with bright but indirect sunlight to prevent this. A place with a spotted but not deep shade that gets at least 6 hours of sun daily is perfect.
Since vanilla orchids are climbing vines, they will require a trellis to help them. Instead, you could set the pot near a tree or a stake so the vines can climb. The vanilla orchid must be prepared to grow vertically.
Therefore, you will need to smoothly connect the plant to the supporting tree, trellis, or stake using plant ties or hooks. (You can buy these hooks or ties at a gardening store or online.)
Stay until the top 2–3 inches of the potting soil has dried before re-watering the orchid. After watering, the soil should be damp but not soggy. In addition, you could spritz your vanilla plant daily with distilled water from a spray bottle. Gently spray the potting medium, stem, and leaves of the plant.
Applying Fertilizer
Fertilizing your vanilla orchid is vital to ensure your orchid will blossom and grow vanilla beans. You can follow the “weekly, weekly” fertilizing method, which means adding a light amount of fertilizer (about half as powerful as the package mandates) once every seven days.
You can then use a high-nitrogen (30-10-10) liquid fertilizer when the plant is developing actively. But, when the orchid is not in dynamic growth, use a 10-10-10 fertilizer.
Keep a close watch; it will take 2-7 years for the plant to produce large enough to blossom, as it must reach 20–40 feet in length. And during this window, water and fertilize the vanilla orchid as before.
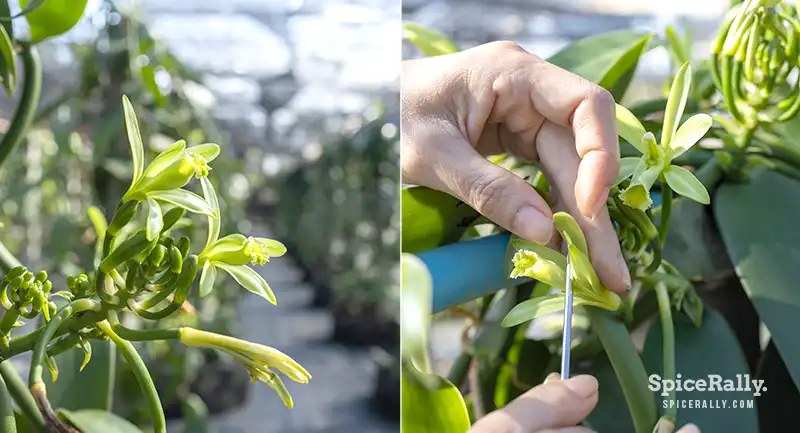
Pollination
As aforementioned, the vanilla orchid only blooms for one 6-week duration per year. Besides, the flowers only last approximately one day.
This suggests you must monitor the orchid closely, inspecting it daily for flowers. When it does bloom, you ought to hand-pollinate the flowers to grow the vanilla beans.
The best time to hand-pollinate the flowers is around 11 in the morning. Push the pollen mob out and keep it up with your right thumb and index finger.
Then you can use your middle finger to force another back and uncover the cam beneath it, which serves as protection.
Position the pollen on the ridge and place the ridge back into location with your left hand and pull the cap back down. Do the same with all the flowers.
Safety Note
Sap from orchid roots and flowers can irritate your skin, so wear gloves and be careful when pollinating or replanting the plant. Since this could be a very delicate process, you can consider asking a local orchid grower to support you in hand-pollinating the initial few times.
Monitor the orchid the day after pollination. The flowers should not drop off, but they will wilt and turn dark brown. It is pollinated if the stem starts to elongate instead of point up. But, you may need to re-pollinate the flower if you don’t see a transformation.
Harvesting Your Vanilla Beans
The vanilla pods will emerge within two months of pollination. But you should wait patiently since they could take 6-9 months to mature.
As we explained earlier, take care of the plant during this period. Then, when the green pods are just beginning to turn yellow, carefully take them off the plant.
Preparation For Curing
Blanching
Then, blanching the beans for 2-5 minutes in heated water (70 degrees Celsius or 158 °F) is necessary after plucking them. Carefully remove them from the water; this kills any contaminants and prepares the beans for curing.
Sweating The Beans Inside A Box
Transfer your vanilla beans to a box lined with a blanket after blanching them. You can use a bamboo box and woolen blankets for this process. Alternatively, you can also use whatever you have on hand.
The beans will sweat moisture from the heat, allowing them to dry out. So, let the beans “sweat” inside the blankets and box for 36-48 hours before removing them.
Sweating The Beans In The Sun
Fan your beans on trays and put them in direct sunlight for 3 hours daily. Then, tuck them in a blanket or cloth and put them in a box to let them sweat overnight. Repeat the procedure of drying and sweating each day until the pods get a deep brown color.
The beans should be allowed to air dry thoroughly to further draw moisture from the beans for another 8-20 days. For best results, you can spread them on trays or hang them up in a drying room, keeping the room at 35 degrees Celsius (95 °F) and 70% humidity.
The beans are perfectly dried once they get a velvety, leathery surface and lots of length-wise creases.
Your Effort And Patience Is Worth It For A Successful Vanilla Harvest!
As you see, growing vanilla counts for some extra work, and you should be able to be patient enough as this plant takes time to give you its harvest. Vanilla thrives best in a tropical climate, but you can grow them in your home garden at a controlled temperature, like inside a greenhouse. It is important to provide the vanilla orchids with the required sunlight, humidity, heat space, and water and care for them after they are planted.


